How to Add Text to Videos in Adobe Premiere Pro?
Table of Contents
- Why Is Text Essential in Video Production?
- How to Set Up Premiere Pro for Text?
- How to Add Basic Text to Your Videos
- How to Create Subtitles and Captions in Adobe Premiere Pro?
- Premiere Pro Text Animation Tools: What Options Are Available?
- Streamlining Your Workflow with Transkriptor
- How to Use Transkriptor with Adobe Premiere Pro: Step-by-Step Guide
- Alternative Solutions for Adding Text to Videos
- Conclusion
Transcribe, Translate & Summarize in Seconds
Table of Contents
- Why Is Text Essential in Video Production?
- How to Set Up Premiere Pro for Text?
- How to Add Basic Text to Your Videos
- How to Create Subtitles and Captions in Adobe Premiere Pro?
- Premiere Pro Text Animation Tools: What Options Are Available?
- Streamlining Your Workflow with Transkriptor
- How to Use Transkriptor with Adobe Premiere Pro: Step-by-Step Guide
- Alternative Solutions for Adding Text to Videos
- Conclusion
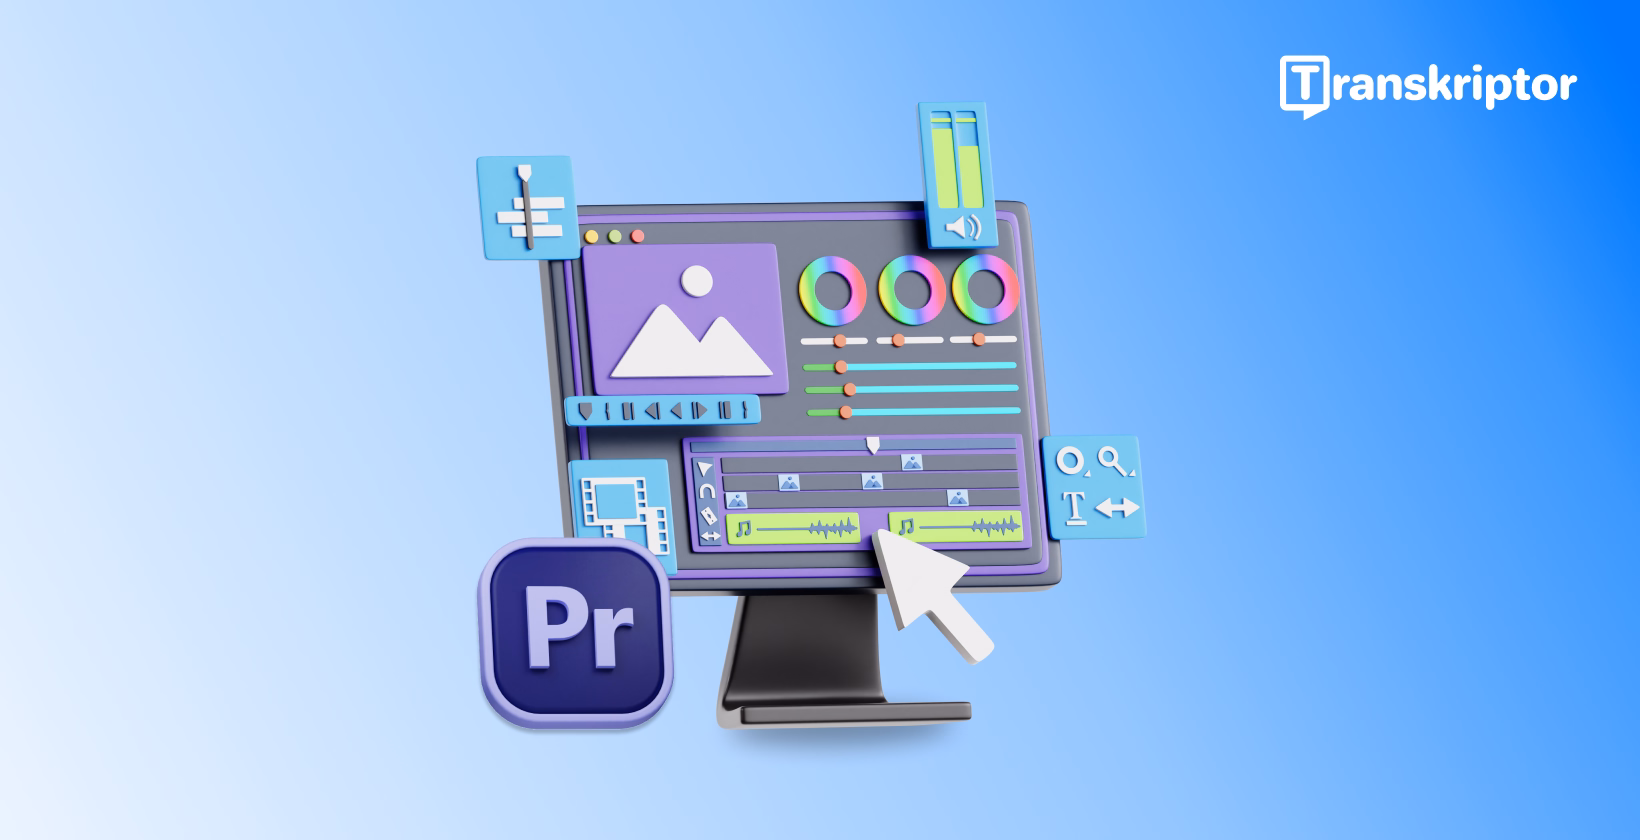
Adding text to video with Adobe Premiere Pro transforms standard footage into professional, informative content. For those using Final Cut Pro, converting text to video can be just as powerful. Premiere Pro offers extensive text capabilities for incorporating titles, captions, subtitles, and dynamic text animations without requiring additional software. The text overlay functionality in Premiere Pro provides complete control over font styles, animations, positions, and formatting options for every video project.
In this blog, we'll explore the process of adding text to videos in Adobe Premiere Pro, from basic title creation to advanced text animation techniques.
Why Is Text Essential in Video Production?
Text elements in video production serve multiple critical functions beyond aesthetic appeal. Text overlays communicate essential information when audio isn't available, enhance accessibility through captions and subtitles, strengthen brand identity through consistent typography, and emphasize key points viewers shouldn't miss. Professional video production relies on strategic text implementation to guide viewers' attention and deliver clear messaging through Adobe video text editor capabilities. According to Preply 's video production survey, videos with professional text elements receive 25% higher engagement rates than those without text.
The importance of text extends to:
Accessibility improvement for hearing-impaired viewers
Language translation facilitation through multilingual captions
Brand reinforcement through consistent styling
Key information highlighting without narration
Professional titles and credits creation
How to Set Up Premiere Pro for Text?
Setting up Adobe Premiere Pro for text addition requires understanding the proper workspace configuration. The Essential Graphics panel serves as the primary interface for text creation in Premiere Pro, offering comprehensive text formatting options and templates for professional text overlays.
Before adding text to video with Adobe Premiere Pro, complete these preparation steps:
Ensure the Essential Graphics panel is visible (Window > Essential Graphics)
Import and organize video assets in the project panel
Create a sequence with appropriate settings
Position the playhead at the desired text insertion point
Consider creating a dedicated video track for text elements

How to Add Basic Text to Your Videos
Adding text to video with Adobe Premiere Pro is a simple yet effective way to enhance storytelling. Audiences who prefer additional context will appreciate the effort of implementing video text overlay. The Adobe video text editor provides intuitive tools for creating professional-looking text elements.
How to Create a New Text Layer?
Creating a new text layer in Adobe Premiere Pro involves a few simple steps:
Open your project in Adobe Premiere Pro and navigate to the Program Monitor
Select the Type Tool (T) from the toolbar or press T on your keyboard
Click anywhere on the video preview to create a text box
Type your text, and Premiere Pro will automatically add a new Graphics Layer to your timeline
To edit the text further, open the Properties Panel (Window > Properties Panel)
What Are the Best Text Formatting Options in Premiere Pro?
Text formatting in Premiere Pro ensures clarity and enhances visual appeal of video text overlays. The Adobe video text editor provides numerous formatting options:
Choose a font from the Properties Panel to match your video's style
Adjust the font size and letter spacing for better visibility
Modify text color or add an outline to improve contrast against the background
Apply a background box or drop shadow for improved text visibility on video
Experiment with opacity settings for subtle text integration
How to Position and Scale Text Elements Properly?
Proper positioning and scaling of text elements enhance the professional appearance of video text overlays:
After selecting the text, navigate to the Properties Panel > Align and Transform
Use the Align options to center-align, left-align, or right-align the text
For manual repositioning, click and drag the text within the Program Monitor
Adjust the Scale slider or use the Selection Tool (V) to resize the text
Use keyframes in the Effect Controls Panel to animate position changes over time

How to Create Subtitles and Captions in Adobe Premiere Pro?
Subtitles and captions represent essential aspects of video content. Without proper captioning, content creators risk losing audience segments. Premiere Pro streamlines the process of adding subtitles and you can easily add caption to video through several dedicated tools and features.
Manual vs. Automated Subtitle Creation: Which Is Better?
When manually creating subtitles, content creators must transcribe and time the dialogue themselves. This method provides precise control over the content. However, formatting the captions proves time-consuming for longer videos.
Automated subtitle creation utilizes the speech-to-text capabilities of Premiere Pro to generate automatic transcriptions. This approach saves considerable time and serves particularly well for projects with tight deadlines. The accuracy limitations become apparent with background noise or heavy accents in the source material.
What's the Process for Adding Subtitles in Premiere Pro?
Adding subtitles in Premiere Pro follows a structured workflow:
Open the Captions Workspace by selecting Window > Workspaces > Captions and Graphics
Select your sequence in the timeline
Click on the Text panel and choose Transcribe Sequence
Customize the transcription settings and click Transcribe
Review and edit the generated text for accuracy
Click Create Captions and adjust the caption settings for format and style
Click Create to generate the captions and add them to your timeline
Use the Properties Panel to modify the appearance of your captions
How Can Video Captioning Software Enhance Premiere Pro Workflows?
While Premiere Pro includes native transcription capabilities, the feature demonstrates inconsistent reliability. Video captioning software integration enhances workflow efficiency and accuracy:
Importing Caption Files: Users can import caption files from external services into Premiere Pro through File > Import
Third-Party Platforms: Tools like Transkriptor provide automated transcription services with higher accuracy
Dedicated Subtitle Tools: Specialized subtitle software offers additional formatting options and time-saving features
Premiere Pro Text Animation Tools: What Options Are Available?
The title creation in Premiere Pro extends beyond static text to include dynamic animations that enhance visual appeal and viewer engagement. The Adobe video text editor includes several animation presets and customization options.
What Text Animation Presets Does Premiere Pro Offer?
Premiere Pro includes numerous text animation presets accessible through the Essential Graphics panel:
Fade In/Out: Simple opacity transitions for text elements
Slide In/Out: Directional movements from off-screen
Type On: Character-by-character appearance mimicking typing
Scale and Rotate: Size and orientation changes
Blur Transitions: Focus/defocus effects for dramatic emphasis
How to Create Custom Text Animations in Premiere Pro?
Creating custom text animations in Premiere Pro involves working with keyframes:
Select the text layer in the timeline
Navigate to the Effect Controls panel
Set the playhead at the animation start point
Create initial keyframes for position, scale, opacity, or rotation
Move the playhead to the end point and adjust properties
Fine-tune the animation using Bezier handles for smooth transitions

Streamlining Your Workflow with Transkriptor
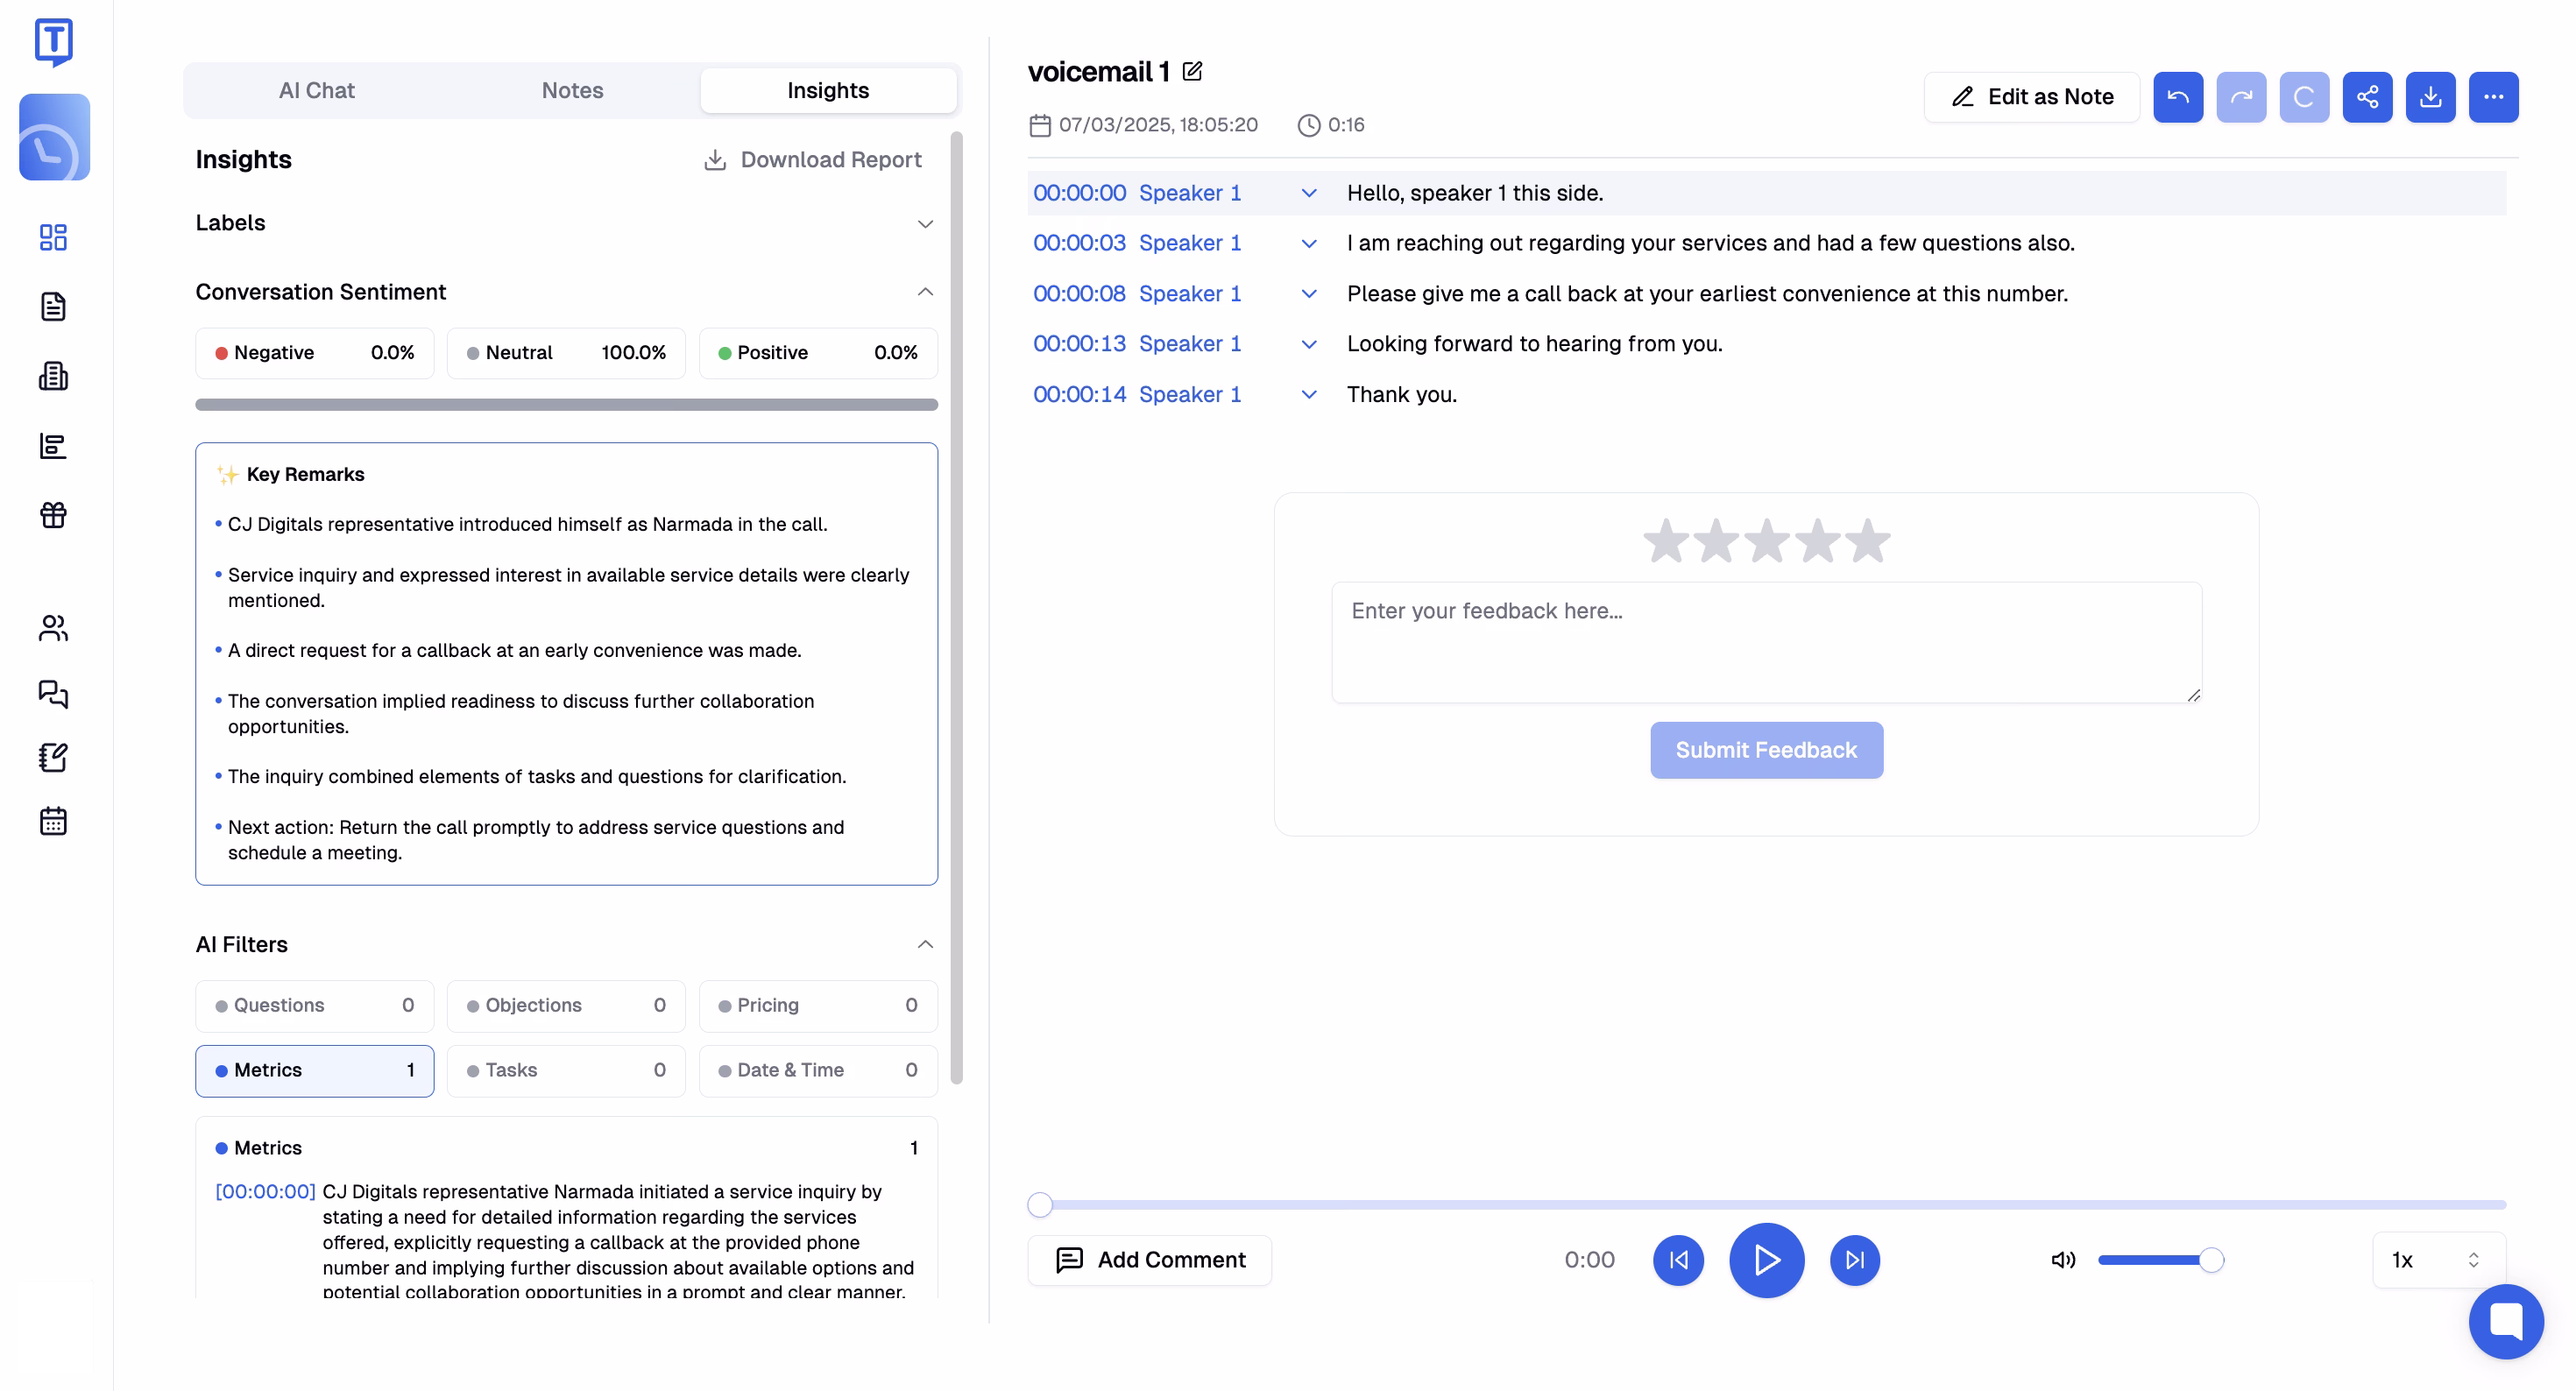
For professional transcription needs, Transkriptor offers advanced capabilities. This audio-to-text tool ensures 99% transcription accuracy for videos including meetings, podcasts, interviews, and lectures. The beginner-friendly dashboard eliminates technical barriers for users of all experience levels.
Transkriptor supports over 100 languages, enabling global content creation. Users simply upload audio or video files, and Transkriptor applies AI algorithms to create captions. The platform supports various file formats, eliminating conversion requirements. After file upload, Transkriptor provides dedicated subtitle generation options for optimized workflows.
Transkriptor: Key Features for Video Creators
AI Subtitle Creation: Transkriptor generates highly accurate AI subtitles within minutes, maintaining quality despite audio challenges like accents or background noise
Multi-Speaker Recognition: The platform accurately identifies multiple speakers in audio files, including speaker labels for better differentiation
Integration Support: Transkriptor integrates with Google Meet, Zoom, and Microsoft Teams for meeting recording, plus Google and Outlook calendar integration
AI Chat Assistant: The built-in AI assistant extracts key information and summarizes meetings, with interaction through built-in templates

Extract valuable insights from video content with Transkriptor's detailed transcription analysis for seamless integration. AI Insights: Transkriptor generates comprehensive transcription analytics including conversation sentiment, speaker talk time, and key remarks
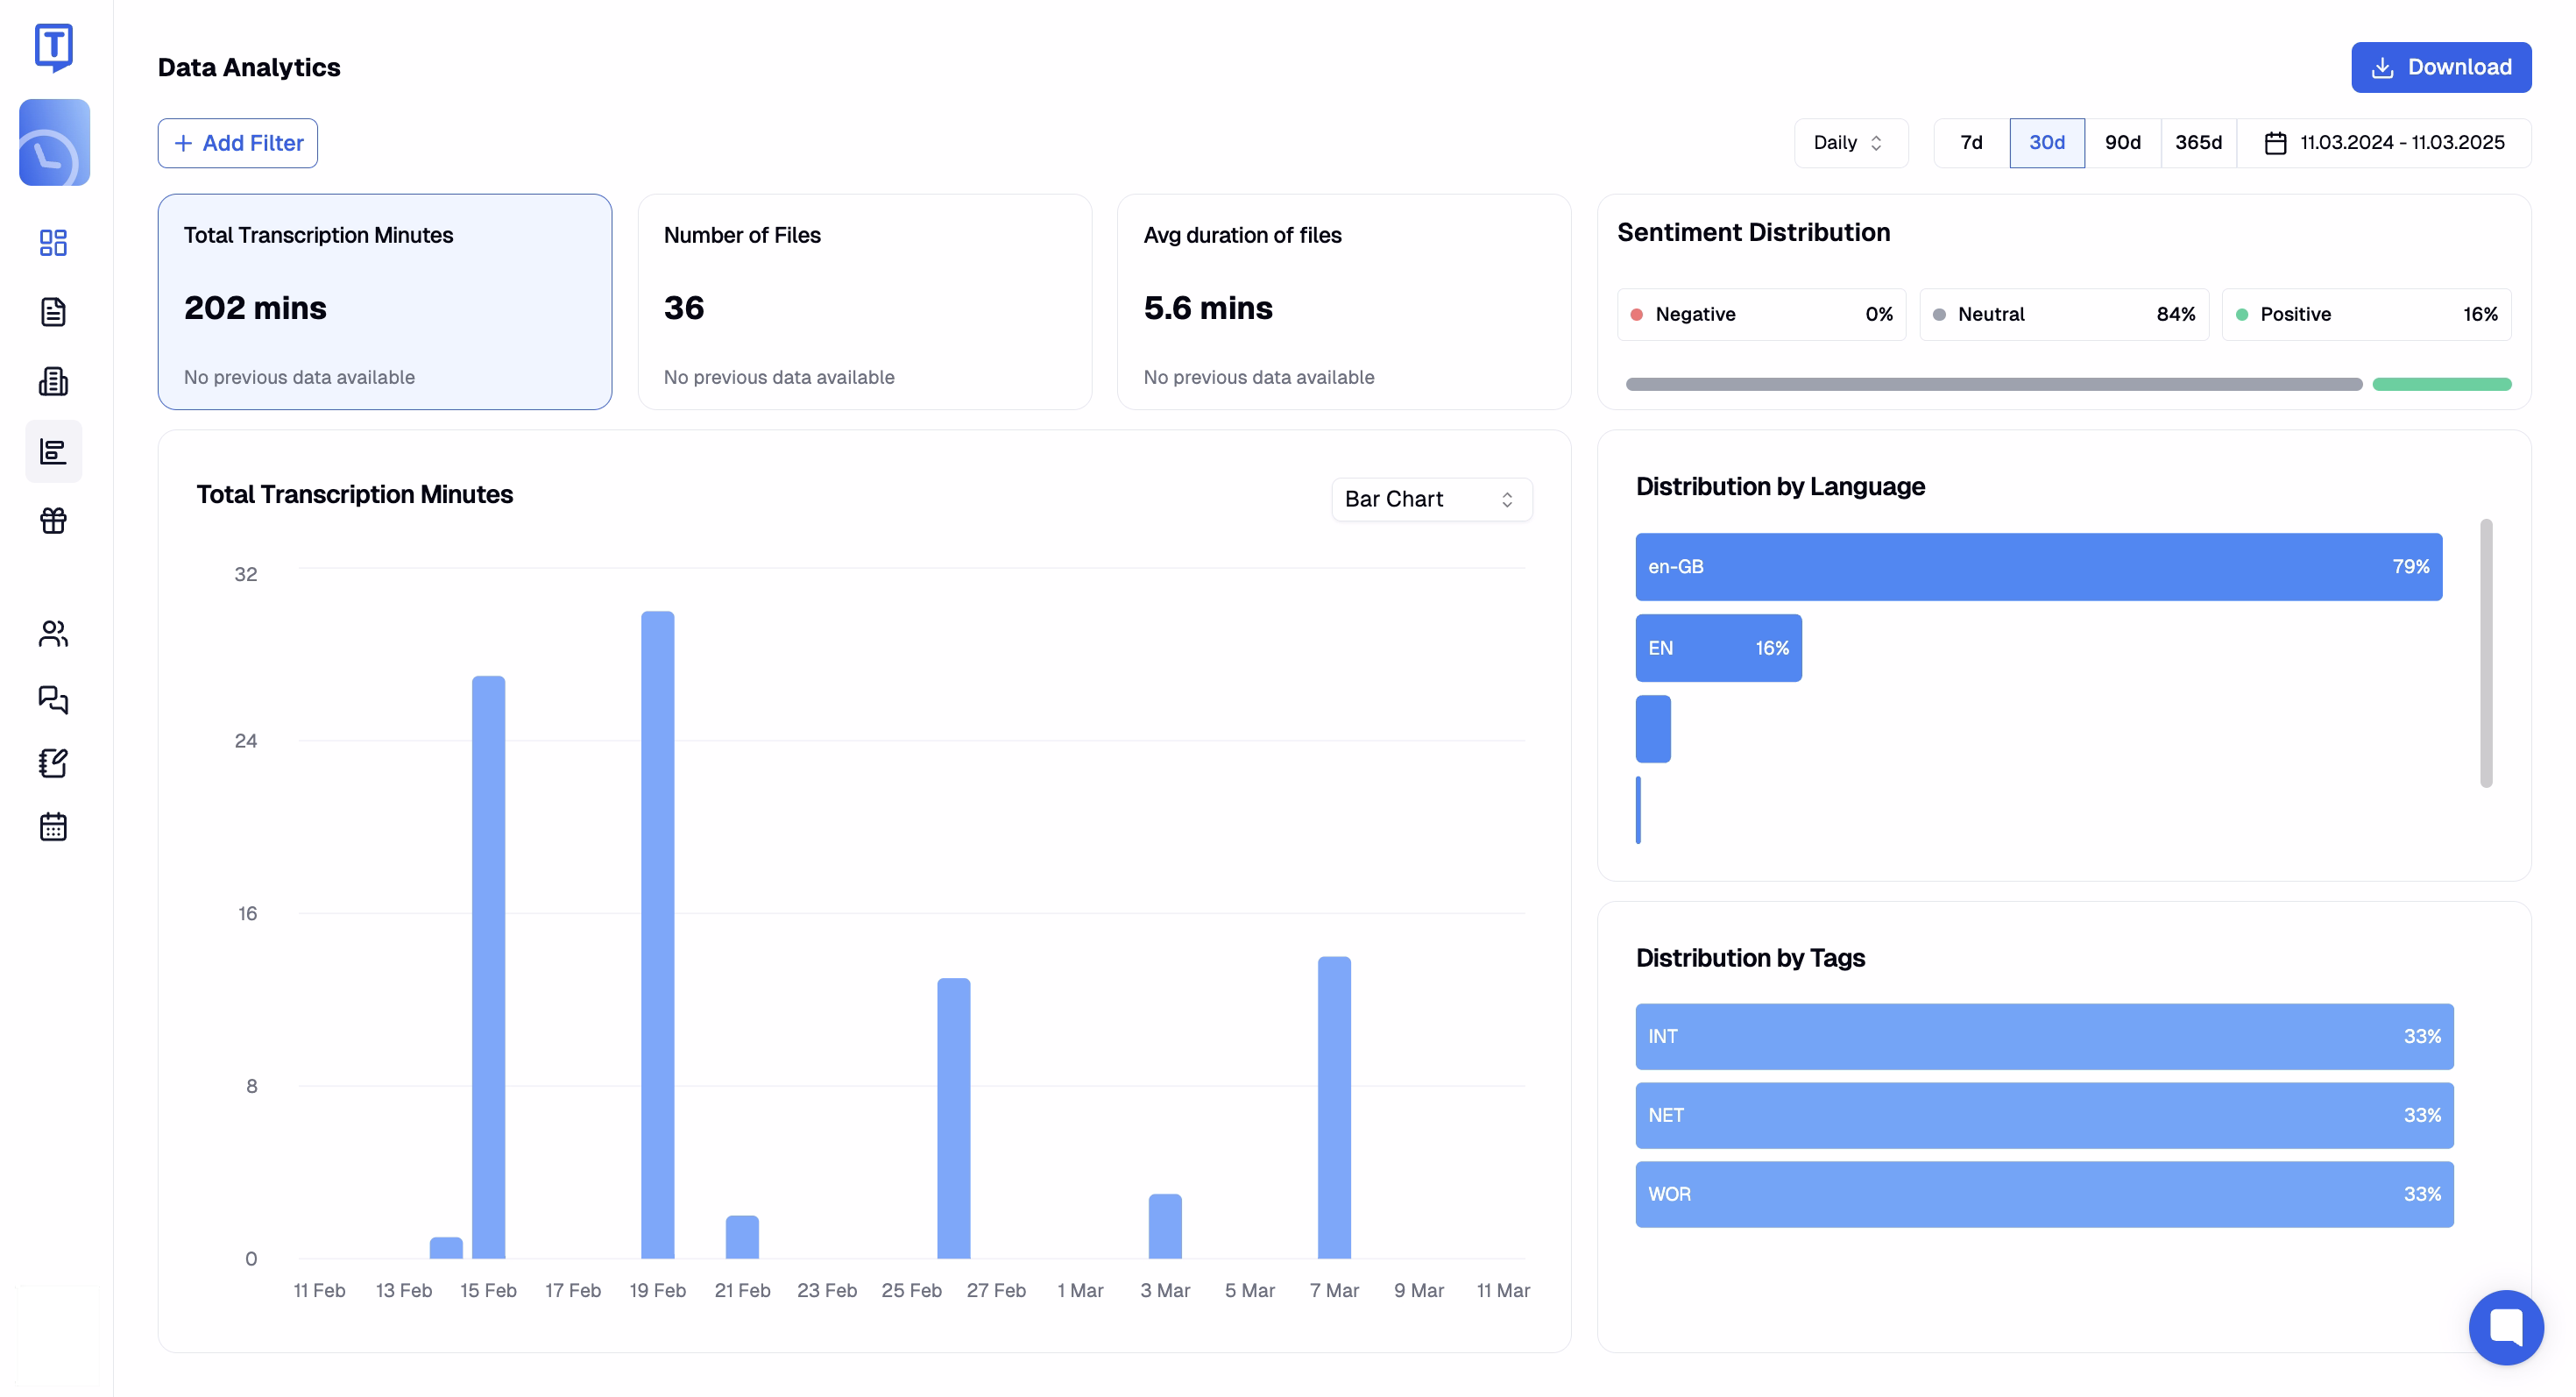
Track transcription usage with analytics that enhance Adobe Premiere Pro projects with content sentiment insights. Data Analytics: The platform provides total transcription minutes, saved file counts, average duration metrics, and transcription distribution by language and tags
How to Use Transkriptor with Adobe Premiere Pro: Step-by-Step Guide
Using Transkriptor with Premiere Pro requires no technical expertise, making it accessible for beginners. The platform maintains high-quality results regardless of audio quality challenges:
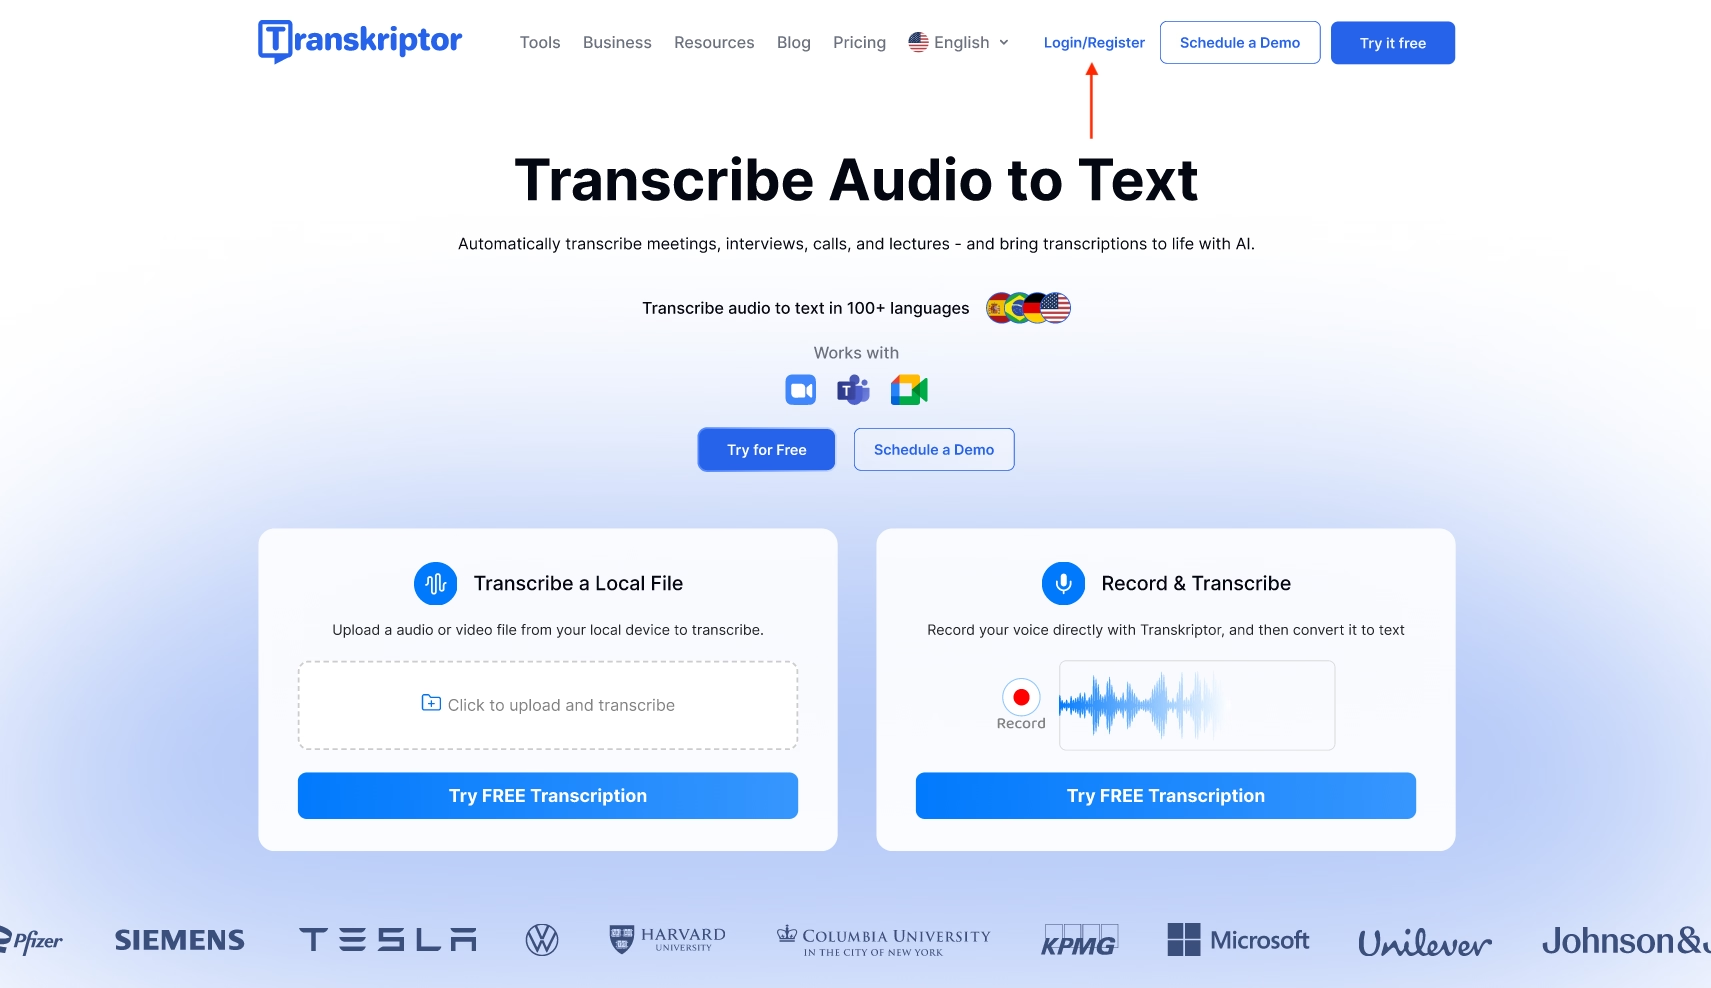
Step 1: Create a Transkriptor Account
First, create a Transkriptor account by clicking the Login/Register option in the top right corner. Use your Google account for simplified registration. After account creation, you'll access the primary dashboard with all tools and features.
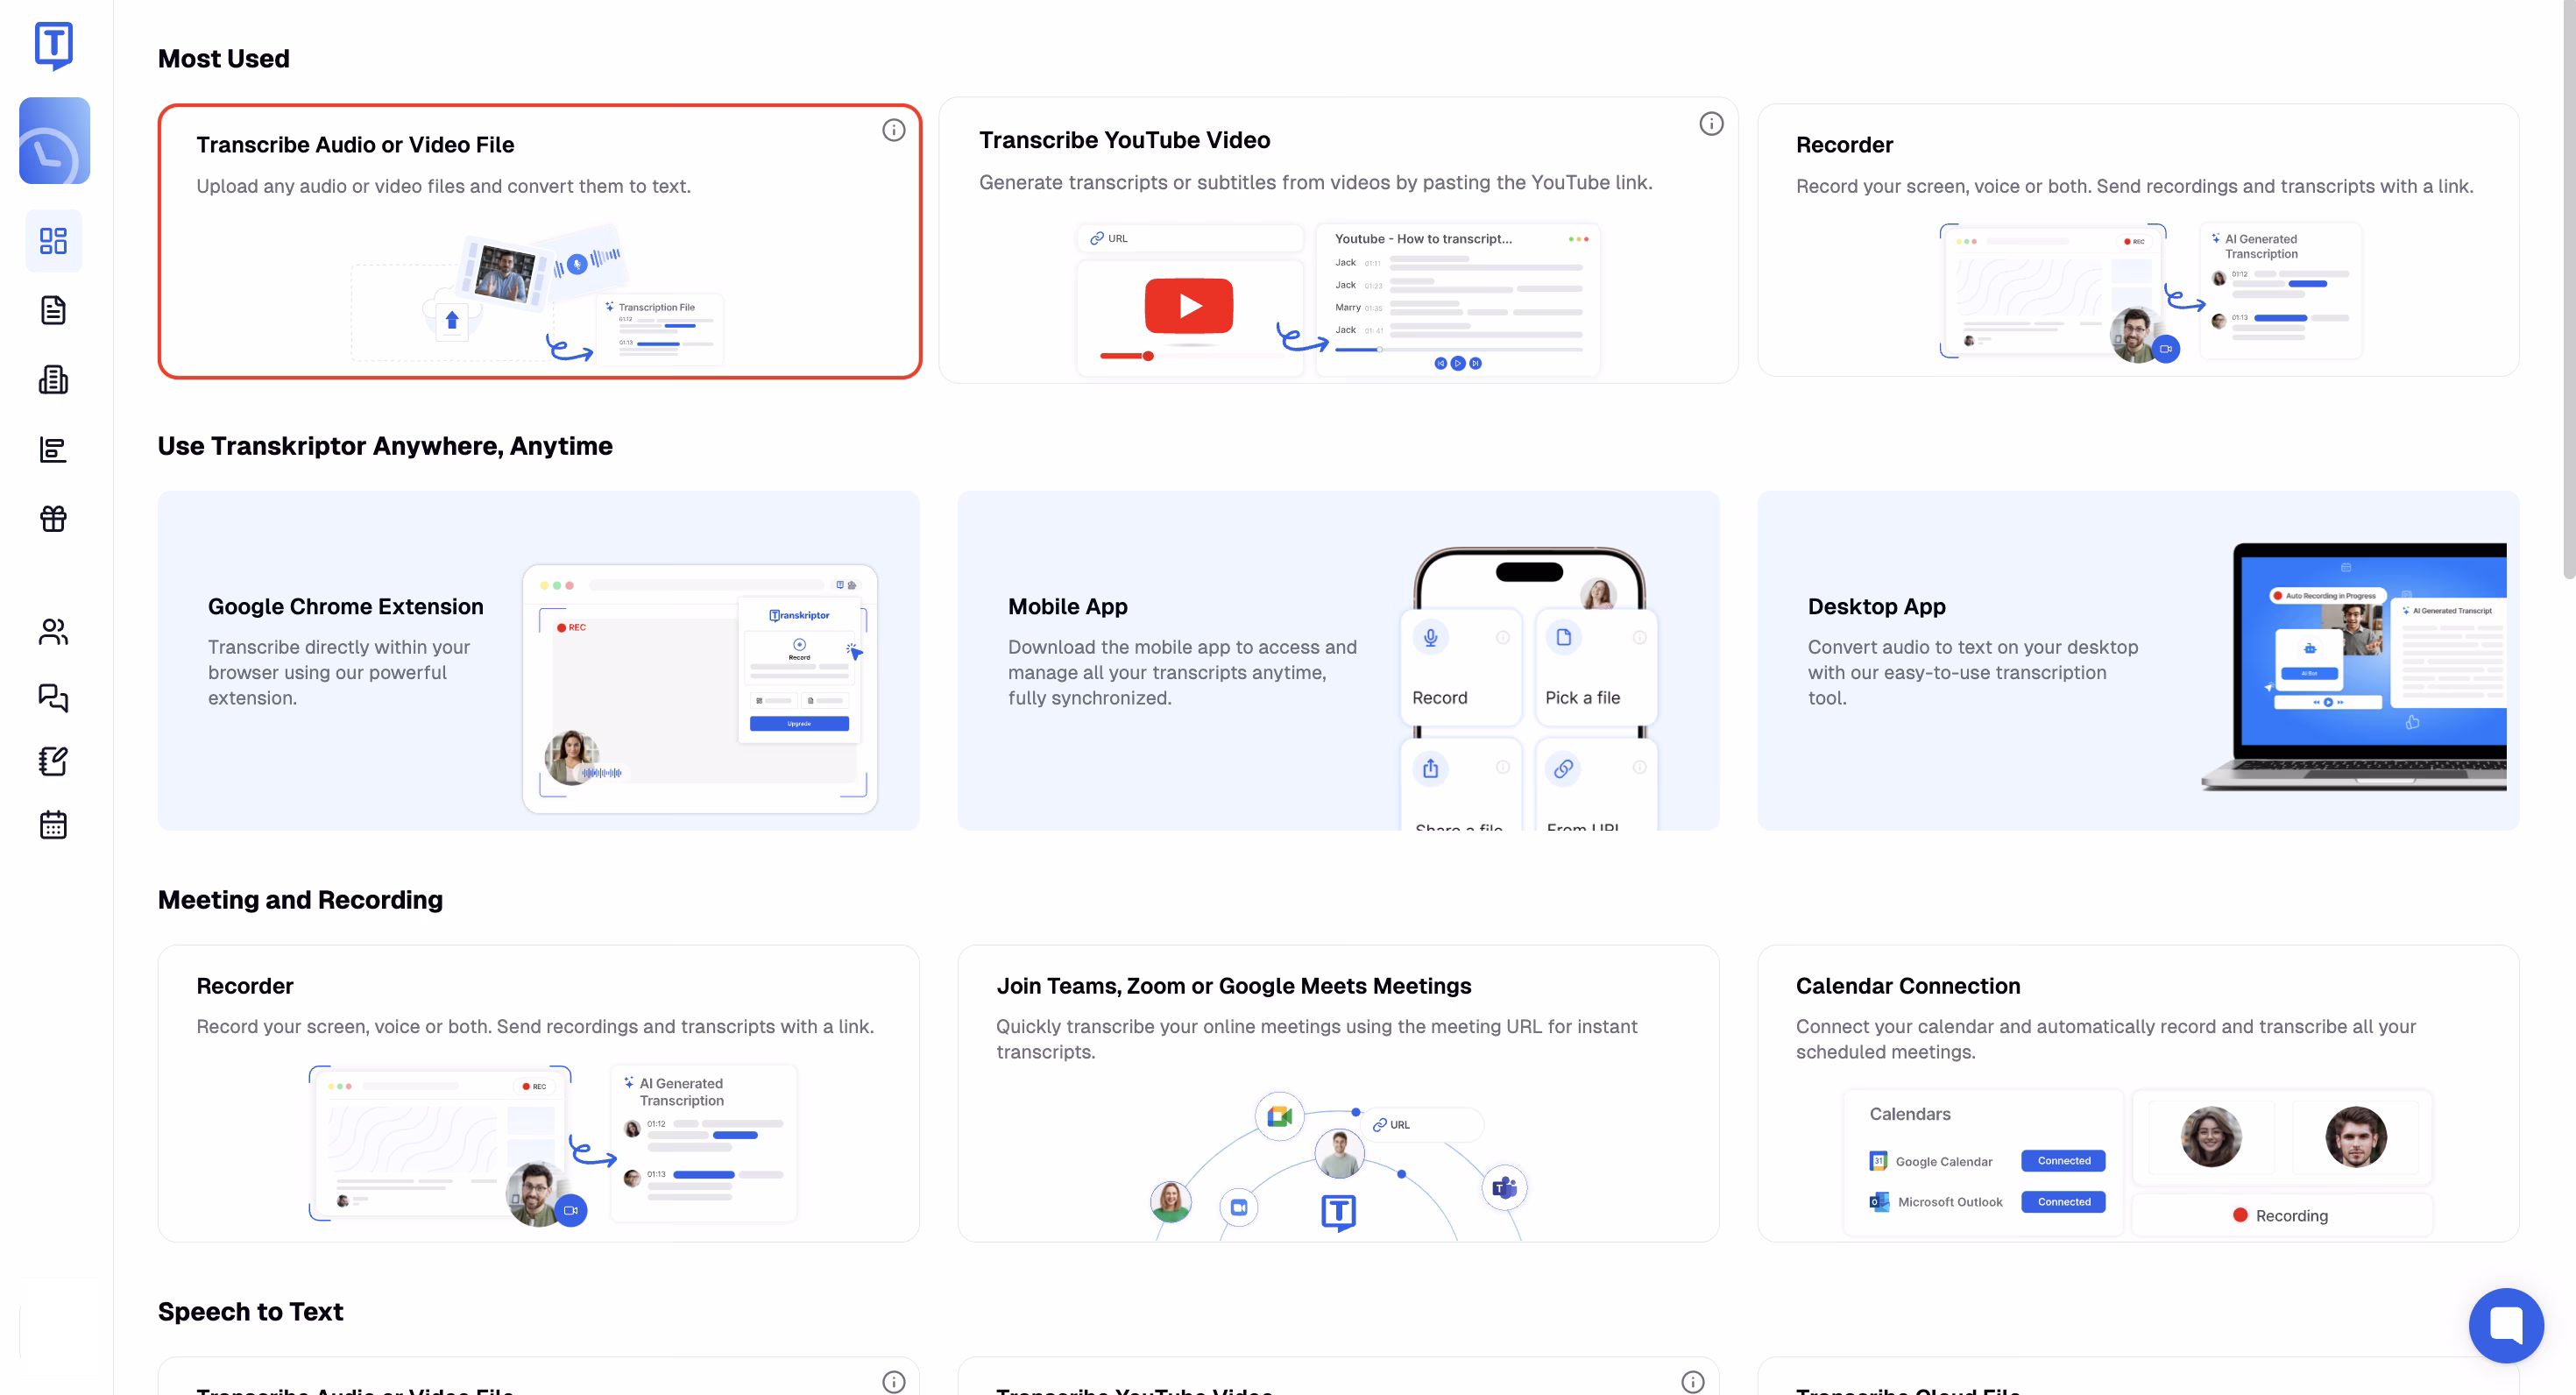
Step 2: Upload the File
From the primary dashboard, select "Transcribe Audio or Video File" to upload local files. For cloud storage files, scroll down on the dashboard and select the "Transcribe Cloud File" option for remote access.
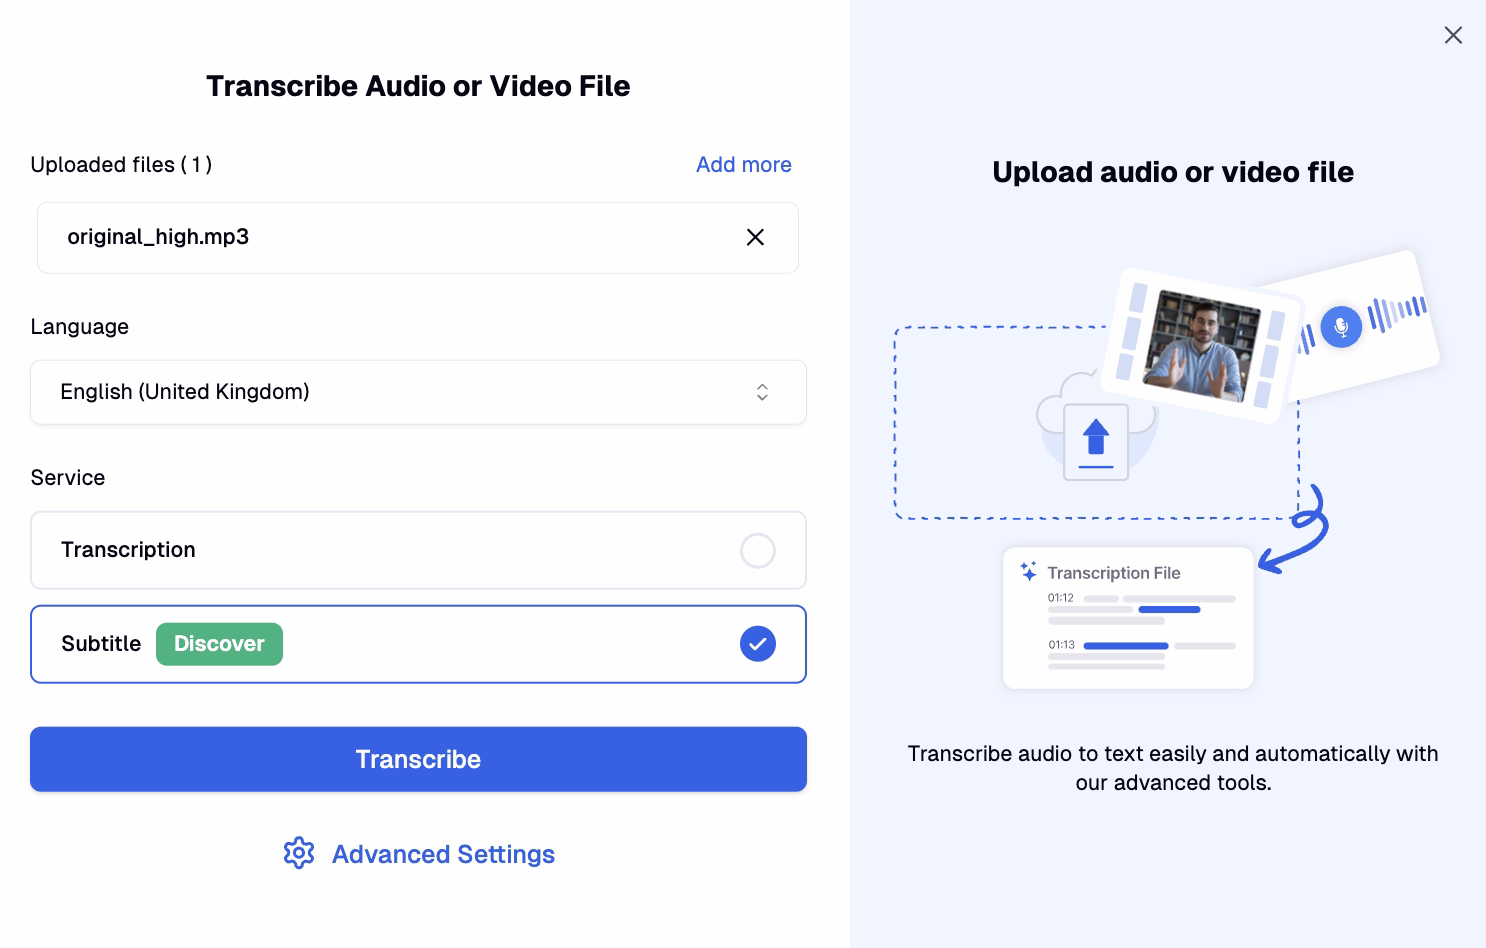
Step 3: Customize the Settings
After file upload, customize the transcription settings according to project requirements. Change the language from the settings panel and choose between Transcription and Subtitle services. Advanced Settings allow custom dictionary creation, file location specification, speaker label configuration, and speaker count adjustment.
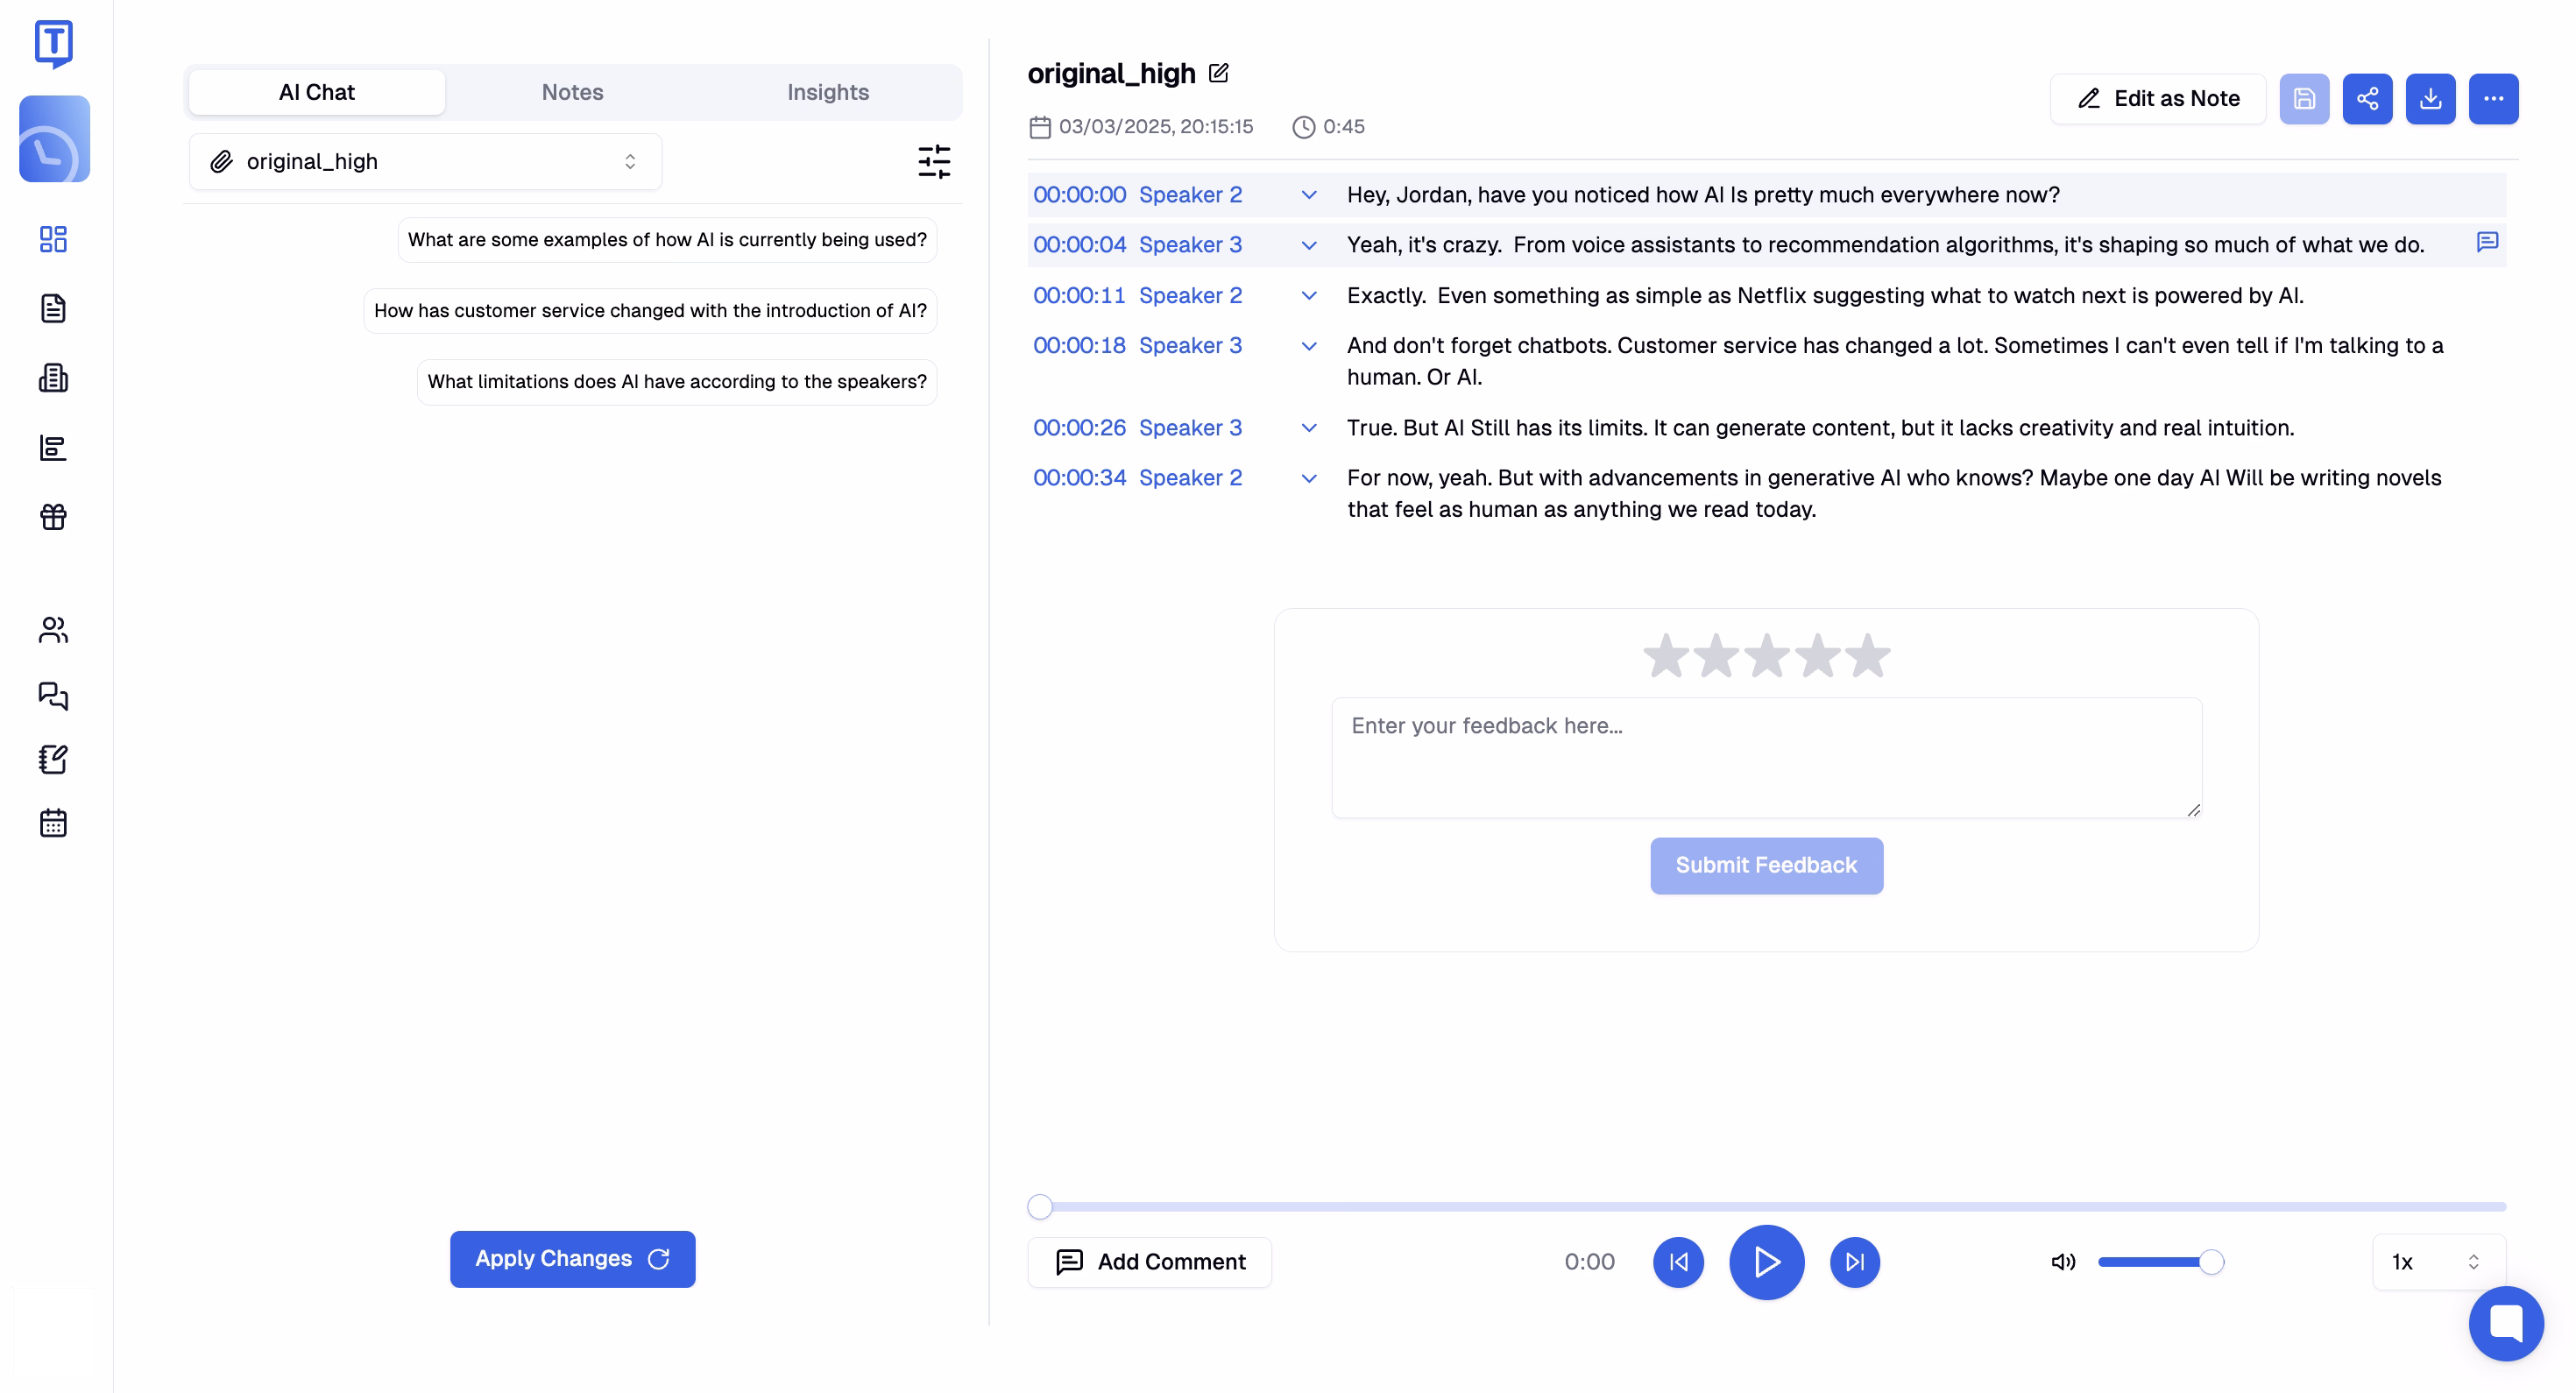
Step 4: Generate and Edit the Transcription
After finalizing settings, click "Transcribe" to access the editing panel. From this interface, edit speaker labels, add team comments, and interact with the AI chat assistant to extract key insights from the content.
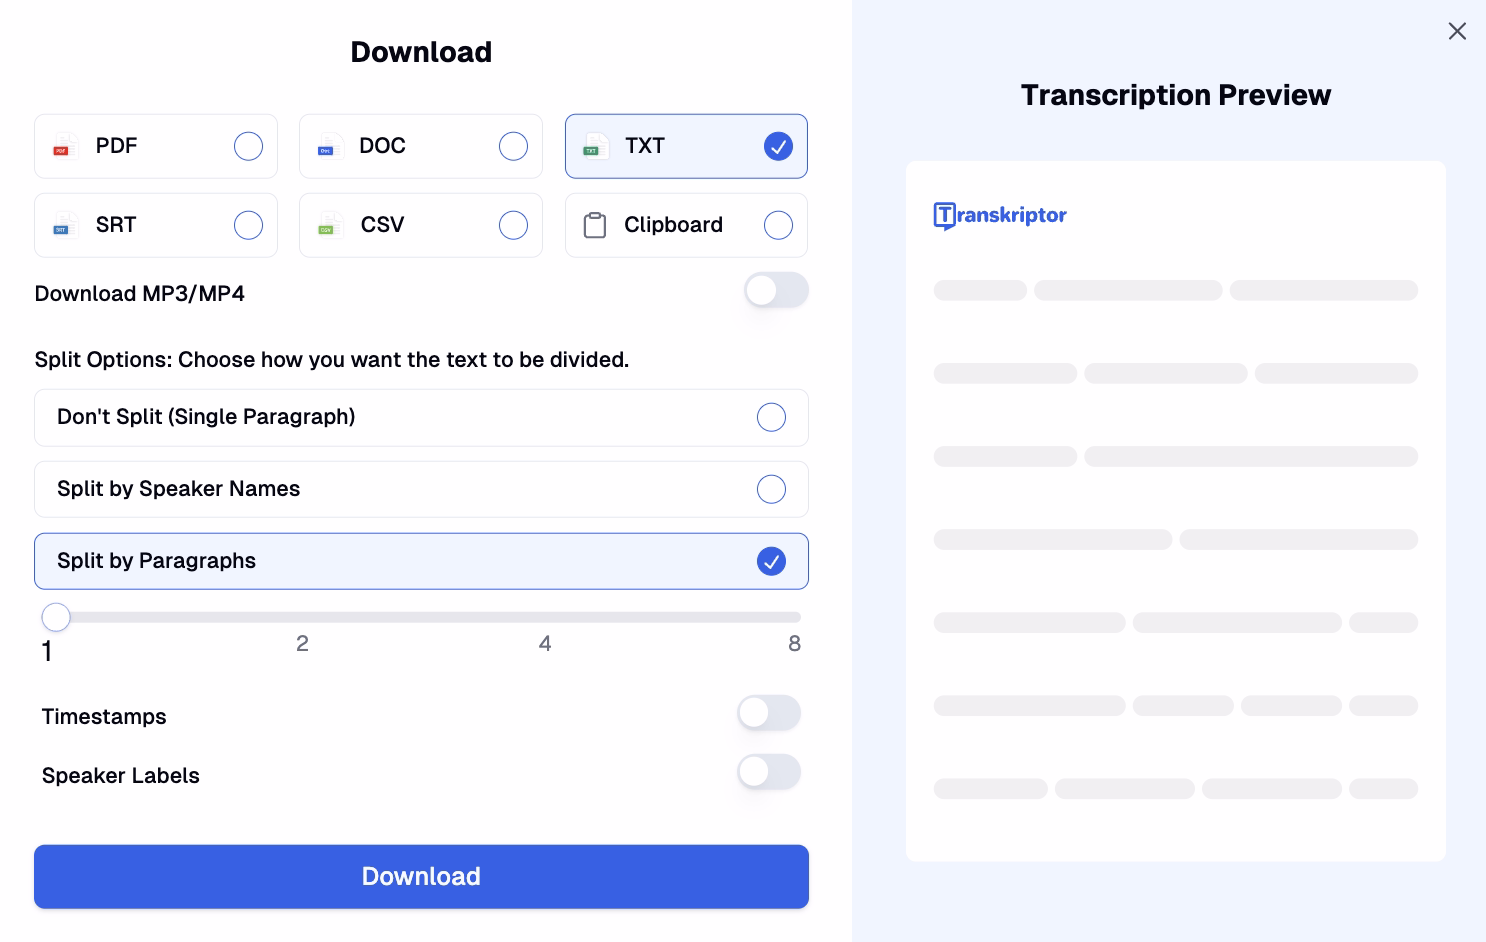
Step 5: Export Subtitles for Premiere Pro
Once satisfied with the results, click the download icon in the top right corner. Download options include PDF, TXT, SRT, DOC, and CSV formats. After saving the file locally, it becomes available for Premiere Pro import.
Step 6: Import the Subtitle in Your Premiere Pro
Import the subtitles using the Captions Workspace option in Premiere Pro. Add the imported caption track to your video sequence, ensuring proper alignment with the video timeline for synchronized playback.
Alternative Solutions for Adding Text to Videos
While adding text to video with Adobe Premiere Pro offers professional results, the higher pricing plans make it unsuitable for beginners and small businesses looking to add text to video ffmpeg. Alternatively, platforms like text to video movavi provide more accessible options for those starting out. Alternatively, you can learn how to add text to video Vegas Pro for a cost-effective solution. Several alternative solutions provide comparable functionality:
Top Video Text Editing Alternatives Overview
DaVinci Resolve: Professional-grade free video editor with comprehensive text tools
Final Cut Pro: Apple's premium editor with AI-powered captioning for Mac users
Pinnacle Studio: Feature-rich editor with manual and imported subtitle support
Filmora: User-friendly editor with extensive text templates for beginners
HitFilm Express: Free editor with motion graphics capabilities for dynamic text
Video Text Editors Comparison Table
| Tool Name | Key Strength | Best For | Price Model | Special Feature |
|---|---|---|---|---|
| Adobe Premiere Pro | Professional text animation | Industry professionals | Subscription | Integration with Creative Cloud |
| DaVinci Resolve | Color grading with text tools | Pro editors on a budget | Free/Paid | Fusion integration |
| Final Cut Pro | Speed and optimization | Mac video professionals | One-time purchase | AI captioning |
| Pinnacle Studio | Ease of use with power | Intermediate editors | One-time purchase | Template library |
| Filmora | User-friendly interface | Beginners | Subscription/Purchase | Text presets |
Let's examine the top alternatives in more detail:
DaVinci Resolve: Professional-Grade Free Text Editing
DaVinci Resolve offers comprehensive video editing capabilities with professional-grade tools for adding and customizing text elements. The Fusion tab provides advanced motion graphics functionality for creating dynamic text animations comparable to Premiere Pro. The free version includes all essential text tools without watermarks.
The learning curve proves steeper than other options, but the professional results justify the investment in learning the interface. For creators seeking Premiere Pro alternatives without subscription costs, DaVinci Resolve represents the most feature-complete option.
Final Cut Pro: Streamlined Text Tools for Mac Users
Final Cut Pro delivers professional video editing exclusively for macOS users. The latest version, Final Cut Pro 11, incorporates AI-powered features including auto-generated captions directly within the timeline for efficient text implementation. The Magnetic Timeline facilitates precise text positioning and timing adjustments.
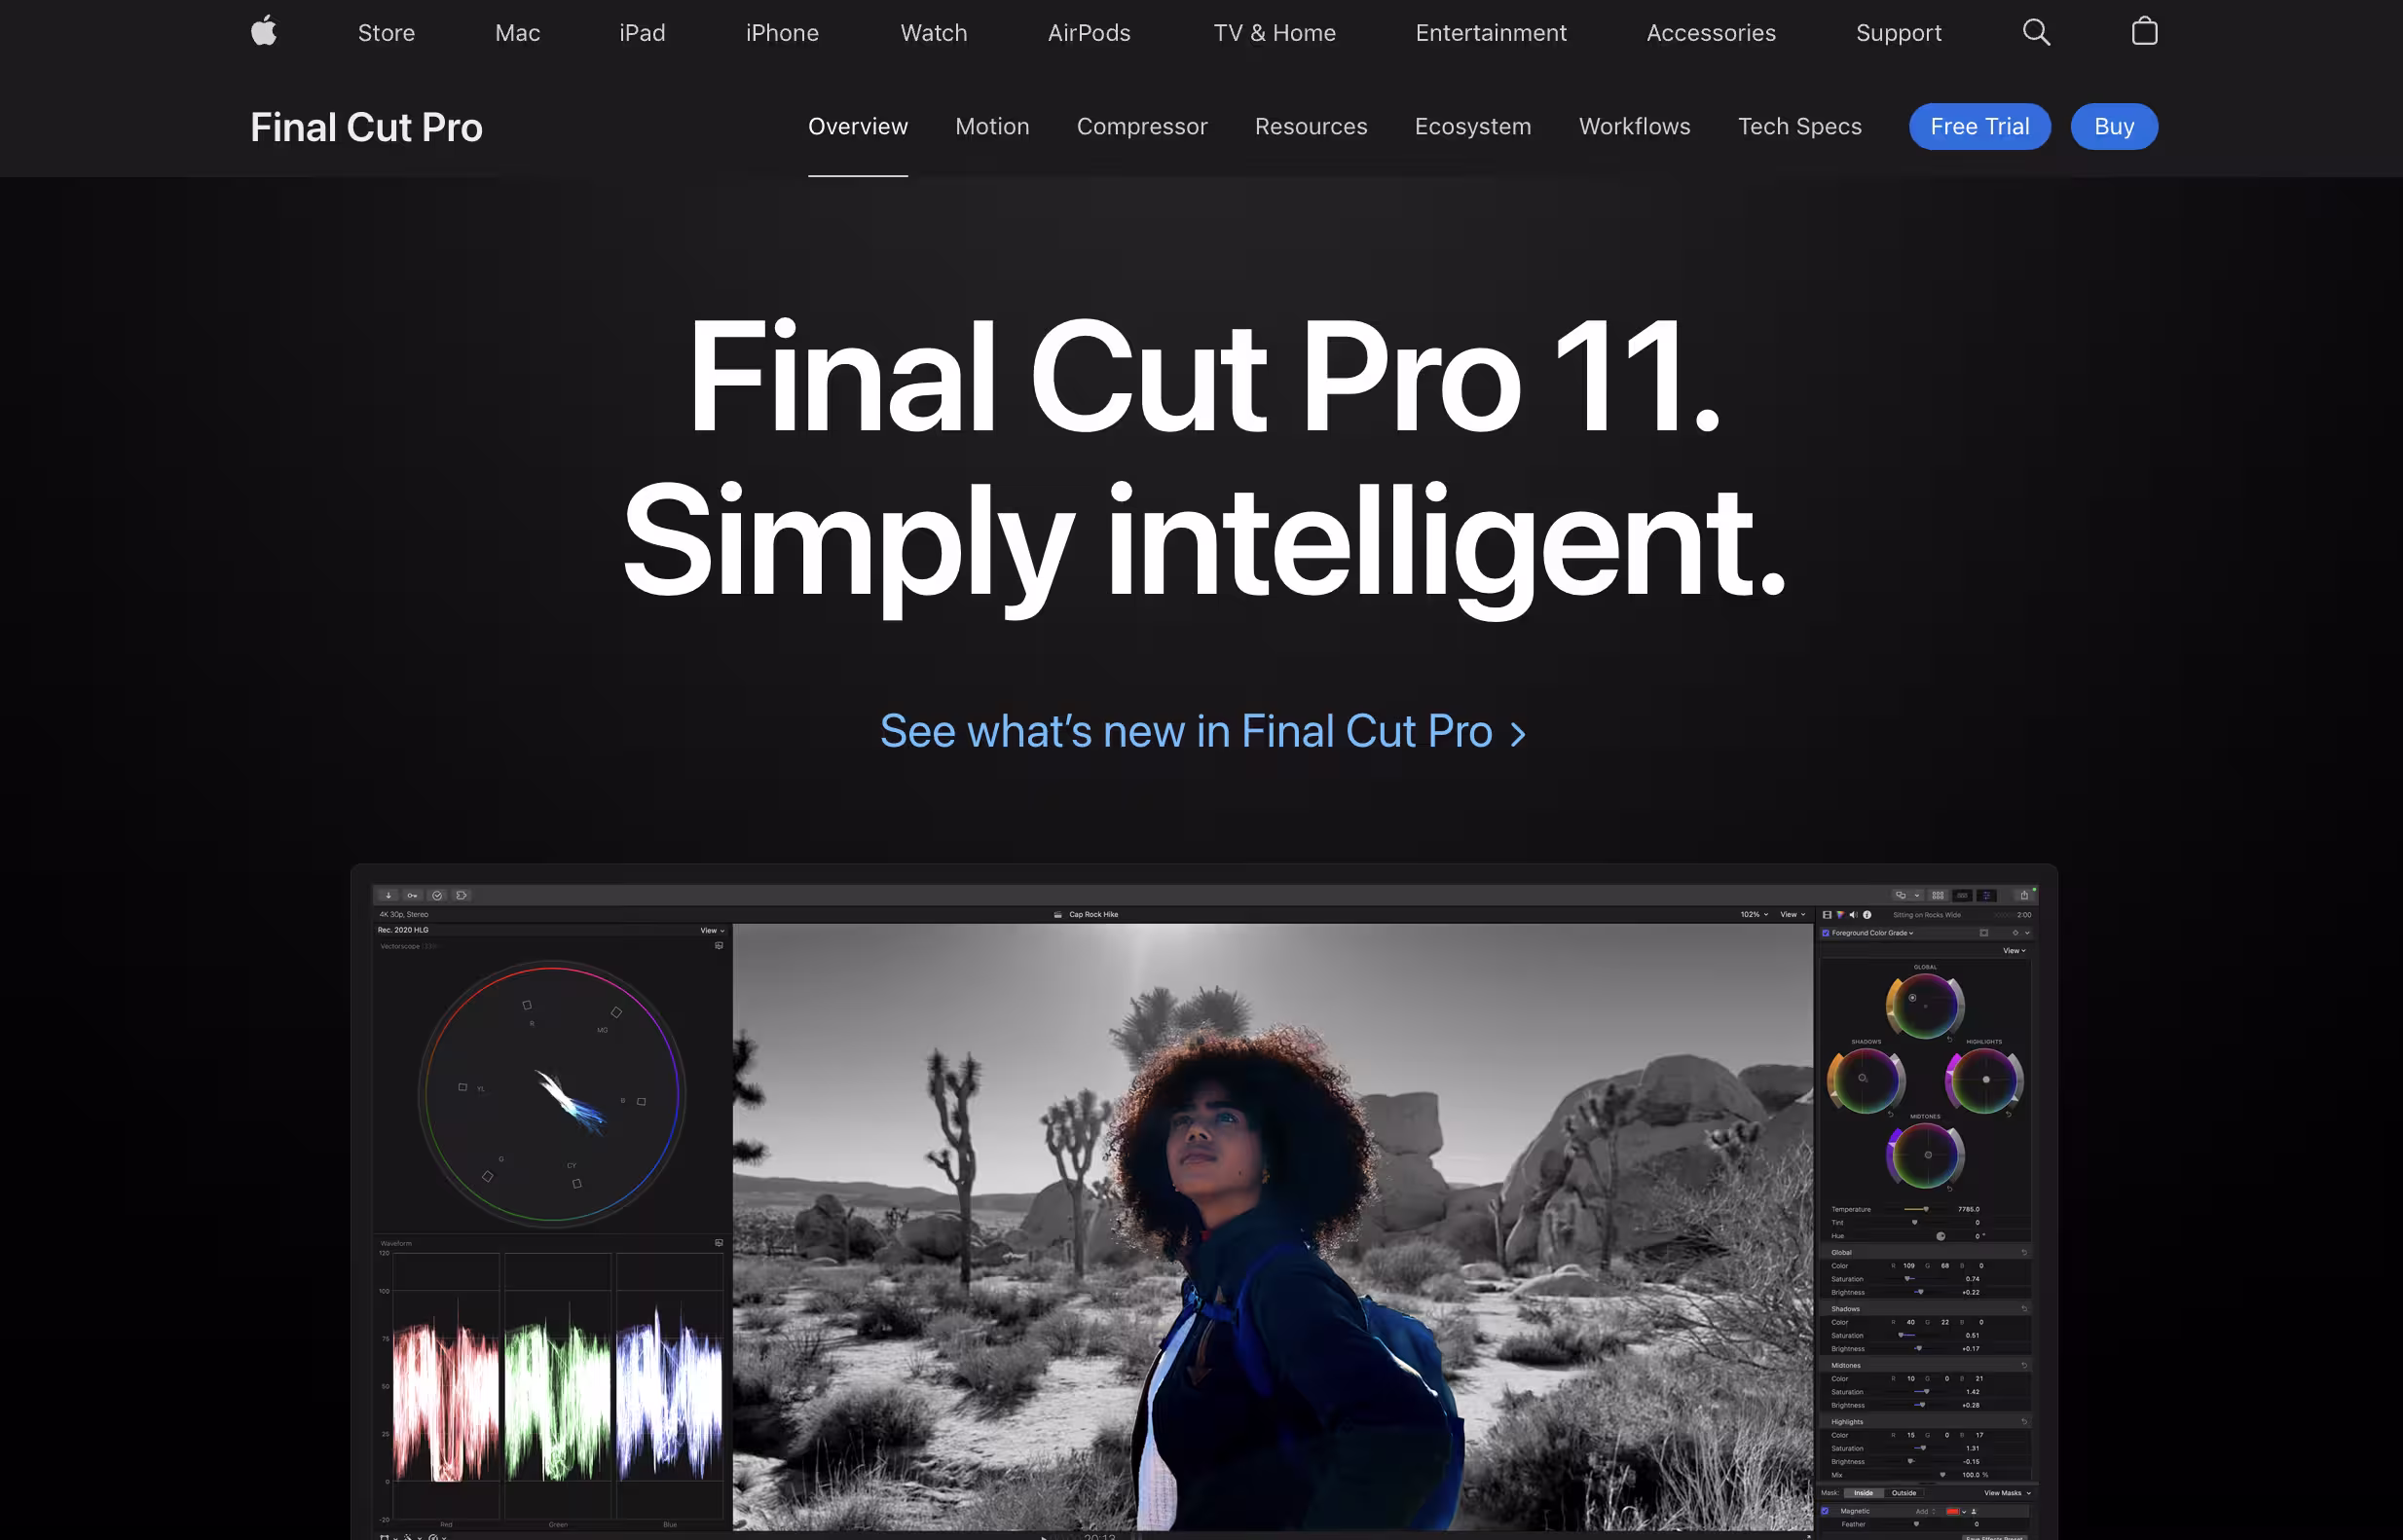
While expensive compared to some alternatives, the one-time purchase model eliminates ongoing subscription costs. The macOS exclusivity limits accessibility for Windows and Linux users seeking Premiere Pro alternatives.
Pinnacle Studio: Accessible Text Tools for All Skill Levels
Pinnacle Studio provides feature-rich video editing with intuitive tools for adding and customizing subtitles and text overlays. Users can manually create subtitles or import caption files in formats like SRT for efficient workflow integration. The timeline-based editing allows precise timing adjustments for optimal readability.
The software lacks advanced AI-powered auto-captioning features found in newer editors. For creators seeking a balance between affordability and professional features, Pinnacle Studio offers a compelling middle-ground solution with one-time purchase pricing.
Conclusion
Adding text to video with Adobe Premiere Pro significantly improves accessibility and engagement metrics for video content. Proper implementation of text elements allows audiences to grasp information quickly without missing contextual details. Following the structured methods outlined in this guide enables creators to add professional text overlays, titles, and captions to video projects.
For creators seeking advanced transcription and subtitle generation capabilities, Transkriptor offers a powerful solution with AI-driven accuracy across 100+ languages. The platform streamlines the often tedious process of transcription and subtitle creation, exporting in multiple formats compatible with Premiere Pro and alternative editing software. By combining Adobe Premiere Pro's robust text editing tools with specialized services like Transkriptor, video creators can achieve professional results that maximize audience engagement and accessibility. Try Transkriptor!