How to Add Subtitles to a Video: A Step-by-Step Guide
Transcribe, Translate & Summarize in Seconds
When you add subtitles to videos, you make them more accessible to a broader audience. Subtitles help those with hearing disabilities understand the content of a video. As a brand, making your content accessible is key to building greater loyalty and increasing viewer engagement.
This guide will show you how to transcribe audio to text and add subtitles using a tool like Transkriptor. It will also highlight the importance of subtitles in your videos and how you can use Transkriptor to do so step by step.
Why are Subtitles Essential for Video Content?
Here are a few key reasons why subtitles are crucial for video content:
Accessibility for Hearing-Impaired Audiences: Video subtitles help those with hearing impairments by improving video accessibility.
Boosting Engagement and Viewer Retention: The better someone understands your video, the more engaged they will be.
Reaching Multilingual or International Audiences: Adding subtitles also helps those with different linguistic backgrounds understand your videos.
Accessibility for Hearing-Impaired Audiences
The first benefit of using transcription software to add subtitles to videos is that it improves accessibility. It helps those with hearing impairments read the subtitles to understand what a video is, which is better than not being able to understand it at all.
In fact, according to a study by the National Institute of Deafness and Other Communication Disorders, one in eight people in the US aged 12 or older have hearing loss in both ears. This makes it crucial that brands cater to such a large segment.
Boosting Engagement and Viewer Retention
Subtitles also help boost engagement rates for those who may not understand the language or accent. They give them a way to access these videos still, increasing retention. Additionally, this can be a great step toward improving your brand reputation.
Reaching Multilingual or International Audiences
Just like you need subtitles when watching a foreign-language film, audiences also need subtitles when watching marketing videos. Adding subtitles using speech-to-text tools ensures you can reach international or multilingual audiences.
What Tools Can You Use to Add Subtitles?
One of the best subtitle tools for video editing is Transkriptor. It uses AI to understand spoken words and accurately convert them into text. It can transcribe audio in more than 100 languages. This makes it ideal for brands or individuals who want to reach a global audience.
Key Features of Transkriptor’s Subtitle Tool
Here are a few subtitling software features Transkriptor offers:
Subtitle Editing View: This offers an intuitive, centralized space to edit subtitles to the last detail.
Advanced Download Options: Download subtitles in various formats for different mediums.
Customization Features: You can set display durations, optimize readability, and more.
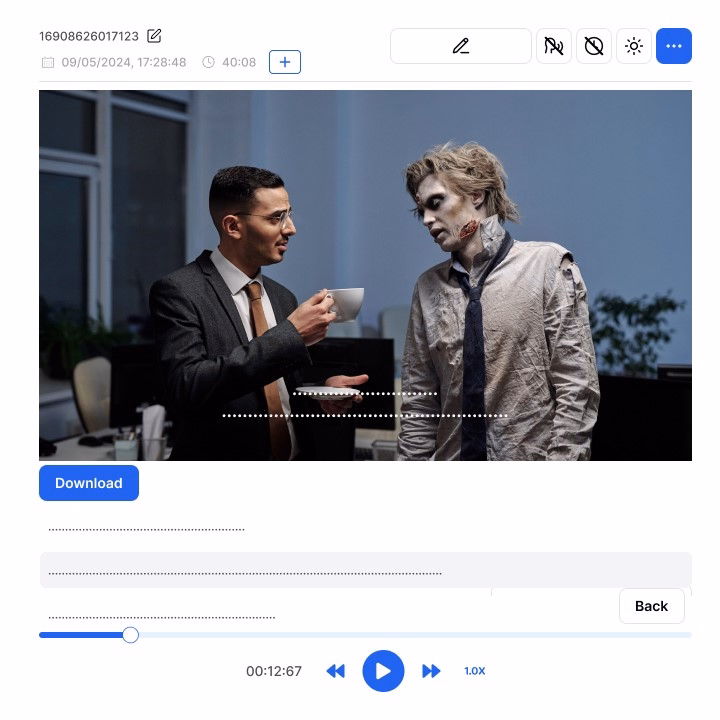
Subtitle Editing View
The subtitle editing view shows the entire editing interface. With this, you can control and edit every aspect of your video subtitles. The subtitle you edit is shown in the center of the interface. You can adjust the timings, edit the text, and test how the subtitles align with the video here. You can use the playback buttons in the bottom right corner.
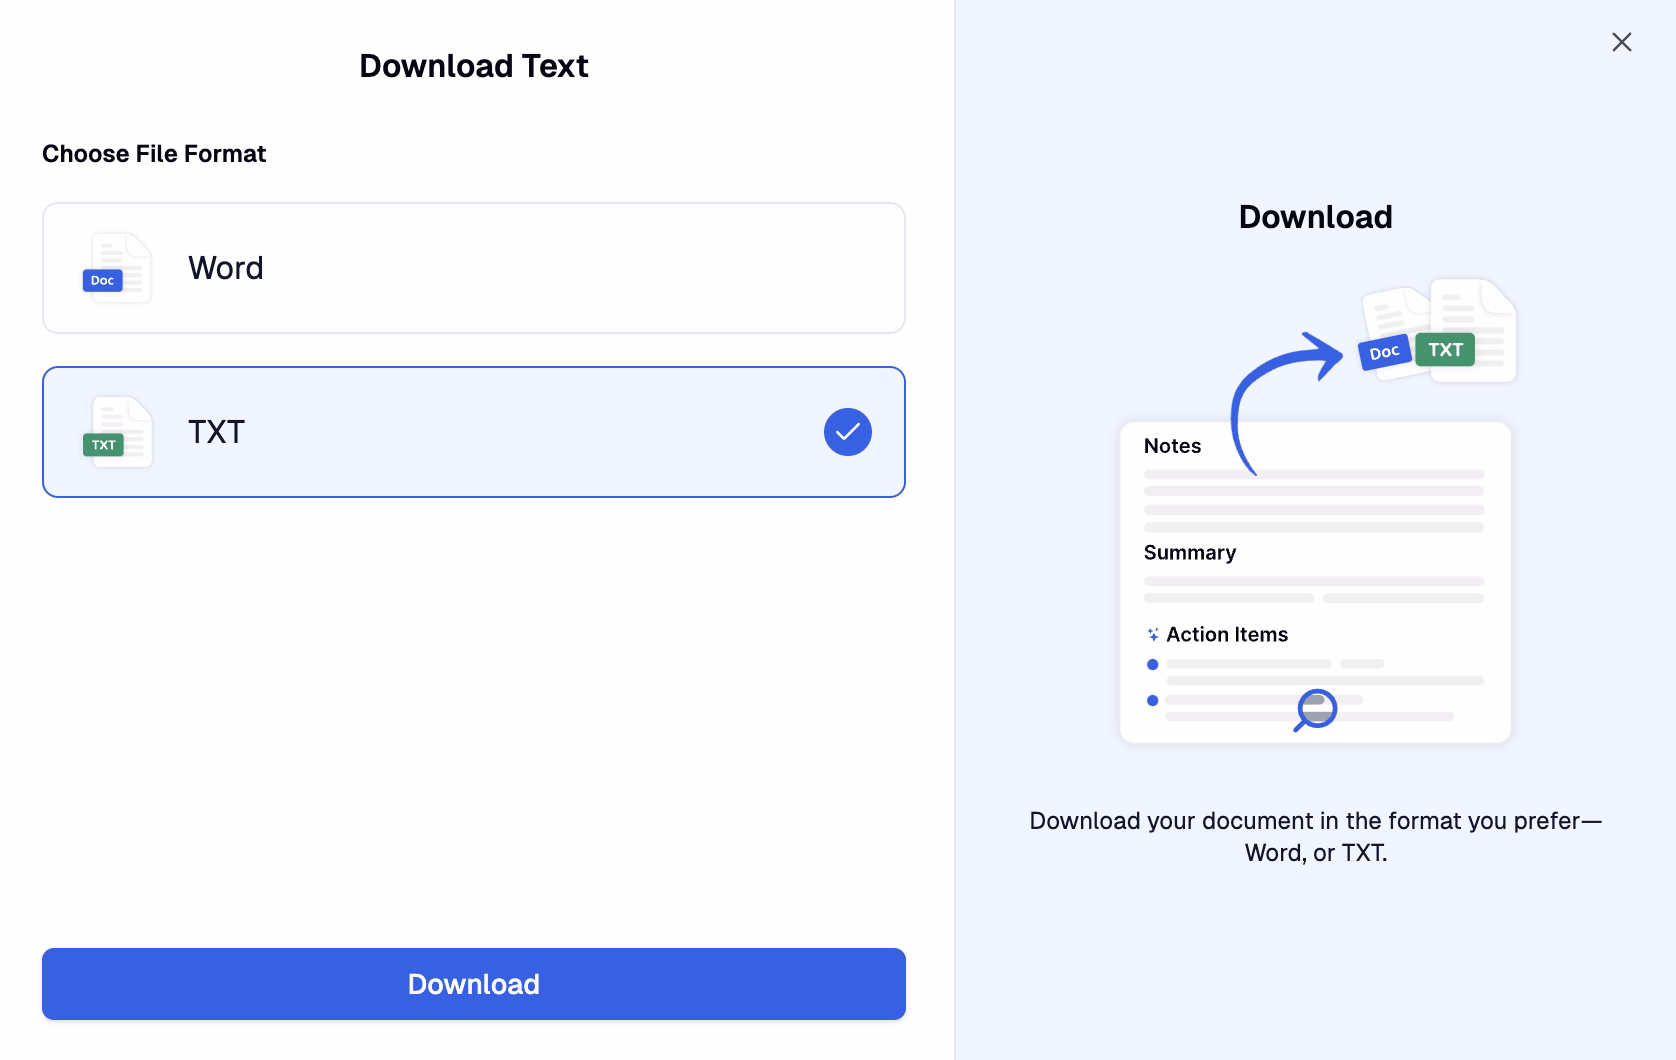
Advanced Download Options
Once you finish fine-tuning your subtitles to the last detail, you can download them in multiple formats. These include WAV or MP3 for audio and in WAV + SRT or MP3 + SRT. You also get various split options that allow you to split subtitles by words, characters, and sentences. You can even separate them based on timestamps and voiceover blocks.
Customization Features
Besides the other features mentioned above, users can also adjust how long the subtitle appears on the screen. You can also set work or character limits to improve readability and ensure the viewer is not overwhelmed. You can also adjust the viability of each line to ensure it aligns with the video.
Step-By-Step Guide to Adding Subtitles
Here are the steps involved in using Transkriptor to convert voice-to-text for video subtitles:
Use multiple options to upload a video file to the Transkriptor dashboard.
Use Transkirptor to generate and edit subtitles to perfection automatically.
Export the subtitles as SRT or any other format. Then, you can integrate them with your video editing software.
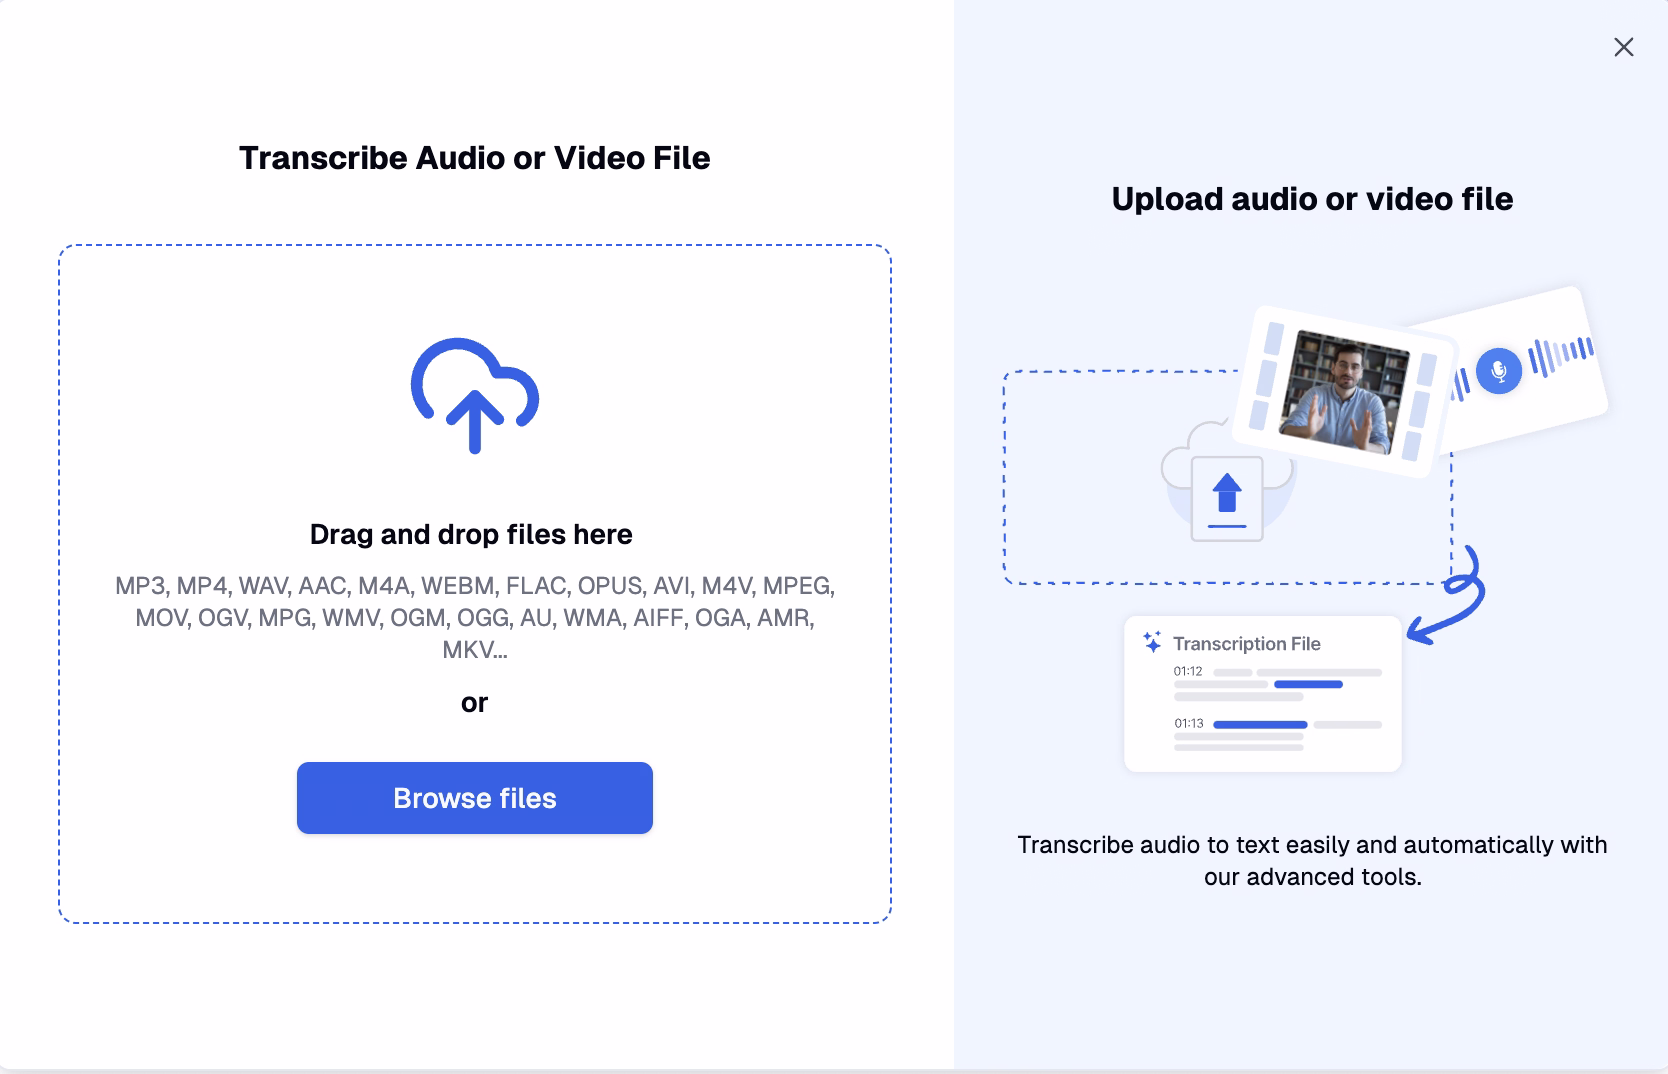
Step 1: Upload Your Video to Transkriptor
The first step to adding subtitles to video transcription software is to upload your video file to Transkriptor. As soon as you log into your Transkriptor account, you will see options to upload a video from your device. You can even transcribe a YouTube video, for example. Once you have uploaded it, you will then be able to generate subtitles for it.
Step 2: Generate and Edit Subtitles
Once your video has been uploaded, generate the subtitles for it. The tool will automatically identify each speaker and generate subtitles accordingly. You can then edit how long the subtitles appear on the screen. You can also limit how long each set of subtitles will be.
Step 3: Download and Add Subtitles
Once you have finished editing your subtitles, you can download them in multiple formats. These include WAV or MP3 for audio and WAV + SRT or MP3 + SRT for video. You can then upload these subtitles to your video editing tool. Then, you can align them with your video before publishing it on your marketing channels.
Advanced Tips for Effective Subtitling
Now that you know how to transcribe audio to text and add subtitles, here are a few tips to make this process more effective:
Use Concise, Clear Text for Readability: The first tip is to use clear and concise language when using captioning tools for videos.
Ensure Proper Timing to Avoid Overlapping Lines: You should always time the subtitles properly when using an automatic subtitle generator for videos.
Test Subtitles for Accuracy and User Experience: you should always test your subtitles after editing them.
Use Concise, Clear Text for Readability
Using concise and clear text makes your subtitles easier to understand. It also prevents readers from reading and deciphering complex jargon during the video, which could affect engagement levels.
Ensure Proper Timing to Avoid Overlapping Lines
There is nothing worse than subtitles overlapping. It demonstrates a lack of professionalism and detracts from the overall user experience. You must always check that your subtitles are properly timed so they align with the video and do not overlap.
Test Subtitles for Accuracy and User Experience
Testing your subtitles becomes crucial to improving the overall user experience. Even though you might have spent a lot of time editing your subtitles, you must text them yourself. This will help you understand how a potential viewer sees and reads them and allow you to identify any errors that need fixing.

Common Challenges When Adding Subtitles
Given below are some of the most common challenges when adding subtitles:
Synchronization Issues: One of the key challenges is synchronizing the subtitles with the videos. This will ensure there is no difference between their timings.
Time-Consuming Manual Tweaks: Manually editing or tweaking your subtitles can often be time-consuming and can impact efficiency.
Synchronization Issues
Synchronizing the subtitles with the video is one of the biggest challenges when creating subtitles with video editing tools. It takes a lot of time to fine-tune and align the two elements. However, with speech-to-text tools for video subtitles, you get a simple editing view that makes this process easy. This ensures that you have a perfectly synchronized output each time.
Time-consuming Manual Tweaks
Making manual adjustments to the subtitles and video is another common challenge. It also takes up a lot of time that you could spend on other, more productive tasks. However, Transkriptor automates this process significantly, making it much more efficient.
Best Practices for Subtitling Multilingual Videos
Here are a few best practices that can help you perfectly subtitle multilingual videos:
Leverage Translation Tools: Accessibility tools for adding captions allow you to create subtitles for a linguistically diverse audience.
Ensure Cultural Relevance: the videos and subtitles must also be culturally relevant and not specific to a single one. This makes your content more accessible.
Leverage Translation Tools
When you transcribe audio and generate subtitles, you will often have to translate them into different languages. This will help you cater to a global audience. Doing this manually can take a lot of time. However, you can translate your subtitles into 100+ languages with Transkeriptor. It automates this process, making it more efficient and saving you a lot of time.
Ensure Cultural Relevance
The subtitles must be culturally relevant and account for their language's nuances. Additionally, they must be timed right to ensure that the video and subtitles synchronize regardless of the language. You can seamlessly do this with a tool like Transkriptor.
Conclusion
Using speech recognition for video subtitling offers several benefits, including improving accessibility, engagement levels, and retention rates. This guide has demonstrated how to use Transkriptor to generate subtitles for your videos. It has also highlighted some of the process's challenges and a few best practices to follow.
You can create subtitles with video editing tools. However, an AI-powered tool like Transkriptor automates converting audio or video files to subtitles. It has an intuitive editing view to fine-tune every detail of your subtitles. You can also use it to convert meeting notes to video captions. This way, you can accurately synchronize it with your video for the best results.